Chapter26 Concurrency: Introduction
线程和进程类似,但多线程程序,共享 address space 和 data。
多线程各自独享寄存器组,切换进程的时候需要上下文切换。
进程上下文切换的时候把上一个进程的寄存器组保存到 PCB(Process Control Block)中,线程切换需要定义一个或更多新的结构体 TCBs(Thread Control Blocks)来保存每个线程的状态。
线程切换 Page table 不用切换,因为线程共享地址空间。
线程拥有自己的栈。

26.1 Why use threads?
Parallelism。单线程程序只能利用一个 CPU 核,多线程程序可以并行利用多个 CPU 核,提高效率。
防止 I/O 操作导致程序 block。即使是单核 CPU,多线程程序可以在一个线程执行 I/O 操作的时候,其他线程继续利用 CPU。
如果是 CPU 密集型工作,单核 CPU 跑多线程对效率提升不大
26.2~26.4 Problem of Shared data
创建两个线程,分别对全局变量 counter 加 1e7, 最后结果会不等于 2e7。
#include <stdio.h>
#include <pthread.h>
#include "common.h"
#include "common_threads.h"

static volatile int counter = 0;

void *mythread(void *arg)
{
	printf("%s: begin\n", (char *) arg);
	int i;
	for (i = 0; i < 1e7; i++)
		counter = counter + 1;
	printf("%s: done\n", (char *) arg);
	return NULL;
}

int main(int argc, char *argv[])
{
	pthread_t p1, p2;
	printf("main: begin (counter = %d)\n", counter);
	Pthread_create(&p1, NULL, mythread, "A");
	Pthread_create(&p2, NULL, mythread, "B");
	// join waits for the threads to finish
	Pthread_join(p1, NULL);
	Pthread_join(p2, NULL);
	printf("main: done with both (counter = %d)\n", counter);
	return 0;
}
pthread_create: 创建线程。
pthread_join: 阻塞等待线程终止。
假设变量 counter 的地址为 0x8049a1c,值为 50, counter = counter + 1的汇编代码为:
mov 0x8049a1c, %eax
add $0x1, %eax
mov %eax, 0x8049a1c
假设 Thread1 在执行到第二行add $0x1, %eax的时候被切换到 Thread2, Thread2 执行完,将 51 写入内存 0x8049a1c 中,再切回 Thread1。这时因为 context switch 的原因,Thread1 也不会重新执行第一行,从内存重新获取值,而是用之前保存在%eax中的 51,再次写入内存 0x9049a1c。这样发生了错误。
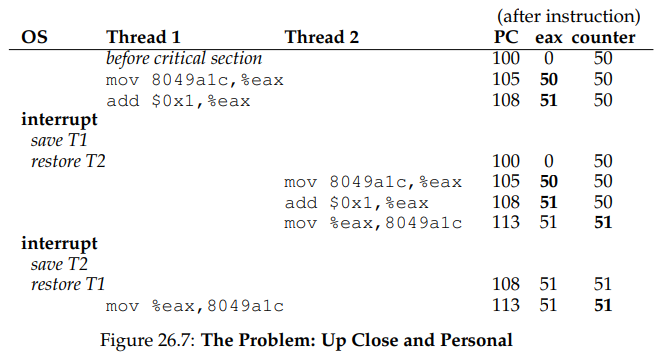
这种情况被称作race condition或data race。会导致race condition的代码段(并行访问共享数据)被称作critical section临界区。
解决这种问题的方法是mutual exclusion互斥。一个线程在访问共享数据的时候,另一个线程无法访问。
26.5 The wish For Atomicity
synchronization primitives 同步原语。
Chapter27 Thread API
27.1 Thread Creation
#include <pthread.h>
int pthread_create(pthread_t *thread, const pthread_attr_t *attr, void *(*start_routine)(void*), void *arg);
pthread_t thread: 需要传入一个pthread_t结构体地址。
const pthread_attr_t *attr: 用来指定一些属性,比如栈大小,线程调度优先级等。还需要调用pthread_attr_init(),使用默认属性直接传入 NULL。
(*start_routine)(void*): 线程调用的函数指针,函数名为 start_routine。
void *arg: 传入函数指针的形参。
如果函数需要的形参是一个 int:
int pthread_create(..., void *(*start_routine)(int), int arg);
如果函数的返回值是 int:
int pthread_create(..., int (*start_routine)(void *), void *arg);
27.2 Thread Completion
int pthread_join(pthread_t thread, void **value_ptr);
value_ptr: 指向线程的 return value,不关注的话传入 NULL。
永远不要在线程执行函数中返回在栈上分配的变量,比如:
void *mythread(void *arg) {
	myarg_t *args = (myarg_t *) arg;
	printf("%d %d\n", args->a, args->b);
	myret_t oops; // ALLOCATED ON STACK: BAD!
	oops.x = 1;
	oops.y = 2;
	return (void *) &oops;
}
27.3 Locks
int pthread_mutex_lock(pthread_mutex_t *mutex);
int pthread_mutex_unlock(pthread_mutex_t *mutex);
初始化锁有两种方式:
pthread_mutex_t lock = PTHREAD_MUTEX_INITIALIZER;
或
int rc = pthread_mutex_init(&lock, NULL); // 第二个参数为可选的属性
assert(rc == 0); // always check success!
使用方法:
pthread_mutex_lock(&lock);
x = x + 1; // or whatever your critical section is
pthread_mutex_unlock(&lock);
用完后需要调用 destroy 函数:pthread mutex destroy()。
一个线程调用pthread_mutex_lock()后,其他线程如果要访问临界区,都会阻塞等待。
下面两个 API,第一个 trylock 会尝试获取一次锁,如果没得到,直接返回 failure,不会阻塞等待。第二个 timedlock 会等待指定的一段时间后再返回 failure。
int pthread_mutex_trylock(pthread_mutex_t *mutex);
int pthread_mutex_timedlock(pthread_mutex_t *mutex, struct timespec *abs_timeout);
27.4 Condition Variables
条件变量。
int pthread_cond_wait(pthread_cond_t *cond, pthread_mutex_t *mutex);
int pthread_cond_signal(pthread_cond_t *cond);
线程使用条件变量的时候首先需要拥有锁。
下面这段示例 code,拿到锁之后,会等待全局变量 ready 非 0,否则会阻塞在Pthread_cond_wait(&cond, &lock)。
pthread_mutex_t lock = PTHREAD_MUTEX_INITIALIZER;
pthread_cond_t cond = PTHREAD_COND_INITIALIZER;

Pthread_mutex_lock(&lock);
while (ready == 0)
	Pthread_cond_wait(&cond, &lock);
Pthread_mutex_unlock(&lock);
某个其他线程来唤醒上面的线程:
Pthread_mutex_lock(&lock);
ready = 1;
Pthread_cond_signal(&cond);
Pthread_mutex_unlock(&lock);
阻塞在Pthread_cond_wait(&cond, &lock)的线程会让出锁进入 sleep,让其他线程能够获得锁来唤醒。
在线程之间需要使用条件变量,而不要使用简单的全局 flag 来进行逻辑判断。
Chapter28 Locks
28.2 Pthread Locks
POSIX 库中用mutex来表示锁。
28.5 Controlling interrupts
在单处理器的系统上,可以通过关闭中断来达到锁的效果。类似如下:
void lock() {
	DisableInterrupts();
}
void unlock() {
	EnableInterrupts();
}
缺点有
- 需要给线程特权操作,这样对系统不安全,恶意线程可以一直占有锁不放开,这样其他线程会全部阻塞。
- 在多核系统上无效,一个 CPU 核禁止中断,其他 CPU 核仍然可以访问临界区。
- 禁止中断会导致这段时间内可能有用的中断会丢失。
28.6 A Failed Attempt: Just Using Loads/Stores
如果没有硬件的支持,想通过 flag 来达到锁的目的,例如:
typedef struct __lock_t { int flag; } lock_t;

void init(lock_t *mutex) {
	// 0 -> lock is available, 1 -> held
	mutex->flag = 0;
}

void lock(lock_t *mutex) {
	while (mutex->flag == 1) // TEST the flag
	; // spin-wait (do nothing)
	mutex->flag = 1; // now SET it!
}

void unlock(lock_t *mutex) {
	mutex->flag = 0;
}
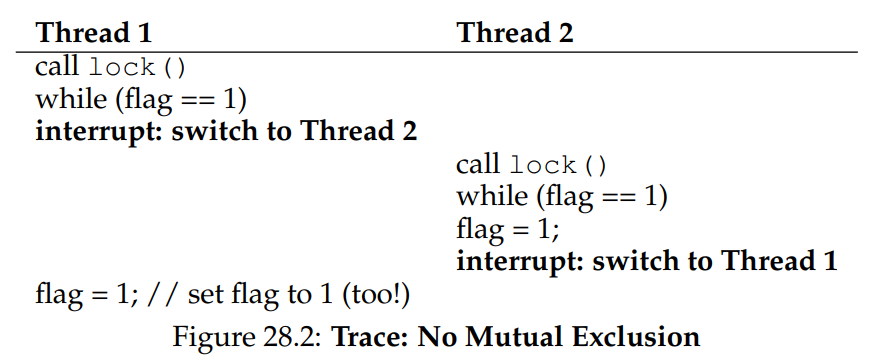
一个线程执行lock()后,全局mutex->flag被置 1,其他所有线程试图通过lock()获取锁时,会阻塞 spin-wait。
这样的实现也会有并发的问题,在 while 判断通过后切换了线程,这样两个线程可能同时都对 flag 置 1:
28.7 Spin Locks with Test-And-Set
接下来几小节会介绍几种实现锁的硬件支持指令,包括:
- Test-And-Set
- Compare-And-Swap
- Load-Linked and Store-Conditional
- Fetch-and-Add
硬件会支持一种 TestAndSet原子交换指令,读出和写入内存地址是原子操作,不会被其他进程打断。一开始锁的 flag 为 0,第一个线程调用 TestAndSet 会返回 0,并且把 flag 置 1,可以跳出循环。后面的线程调用 TestAndSet 会返回 1,不断 spin。
int TestAndSet(int *old_ptr, int new) {
	int old = *old_ptr; // fetch old value at old_ptr
	*old_ptr = new; // store ’new’ into old_ptr
	return old; // return the old value
}
因此自旋锁利用原子交换,基本实现如下:
typedef struct __lock_t {
	int flag;
} lock_t;

void init(lock_t *lock) {
	// 0: lock is available, 1: lock is held
	lock->flag = 0;
}

void lock(lock_t *lock) {
	while (TestAndSet(&lock->flag, 1) == 1)
	; // spin-wait (do nothing)
}

void unlock(lock_t *lock) {
	lock->flag = 0;
}
在 lock 的时候使用原子交换指令。
28.9 Compare-And-Swap
另一种硬件原语 Compare-And-Swap。判断锁的 flag 是否和预期相同,相同则更新值。
int CompareAndSwap(int *ptr, int expected, int new) {
	int original = *ptr;
	if (original == expected)
	*ptr = new;
	return original;
}
利用该硬件原语,同样可以实现自旋锁:
void lock(lock_t *lock) {
	while (CompareAndSwap(&lock->flag, 0, 1) == 1)
	; // spin
}
28.10 Load-Linked and Store-Conditional
一些平台提供了实现临界区的指令,比如 MIPS 的 Load-Linked and Store-Conditional。其他平台也有类似的指令。
Load-Linked(LL)链接加载和普通 load 指令没什么不同。
Store-Conditional(SC)条件存储是只有上一次链接加载的地址在期间没有更新过,才能成功。
int LoadLinked(int *ptr) {
	return *ptr;
}

int StoreConditional(int *ptr, int value) {
	if (no update to *ptr since LL to this addr) {
		*ptr = value;
		return 1; // success!
	} else {
		return 0; // failed to update
	}
}
利用 LL 和 SC 实现锁:
void lock(lock_t *lock) {
	while (1) {
		while (LoadLinked(&lock->flag) == 1)
			; // spin until it’s zero
		if (StoreConditional(&lock->flag, 1) == 1)
			return; // if set-to-1 was success: done
			// otherwise: try again
	}
}

void unlock(lock_t *lock) {
	lock->flag = 0;
}
28.11 Fetch-And-Add
int FetchAndAdd(int *ptr) {
	int old = *ptr;
	*ptr = old + 1;
	return old;
}
利用该硬件原语,可以实现一种Ticket Lock,一种公平的锁。
typedef struct __lock_t {
	int ticket;
	int turn;
} lock_t;

void lock_init(lock_t *lock) {
	lock->ticket = 0;
	lock->turn = 0;
}

void lock(lock_t *lock) {
	int myturn = FetchAndAdd(&lock->ticket);
	while (lock->turn != myturn)
	; // spin
}
void unlock(lock_t *lock) {
	lock->turn = lock->turn + 1;
}
28.14 Using Queues: Sleeping instead of Spinning
前面的方法让拿不到锁的线程一直自旋,或者直接让出 CPU,都会浪费 CPU,也不能防止饿死。
提供一种将等待锁的线程加入队列的方法。
typedef struct __lock_t {
	int flag;
	int guard;
	queue_t *q;
} lock_t;

void lock_init(lock_t *m) {
	m->flag = 0;
	m->guard = 0;
	queue_init(m->q);
}

void lock(lock_t *m) {
	while (TestAndSet(&m->guard, 1) == 1)
		; //acquire guard lock by spinning
	if (m->flag == 0) {
		m->flag = 1; // lock is acquired
		m->guard = 0;
	} else {
		queue_add(m->q, gettid());
		m->guard = 0;
		park();
	}
}

void unlock(lock_t *m) {
	while (TestAndSet(&m->guard, 1) == 1)
		; //acquire guard lock by spinning
	if (queue_empty(m->q))
		m->flag = 0; // let go of lock; no one wants it
	else
		unpark(queue_remove(m->q)); // hold lock
	// (for next thread!)
	m->guard = 0;
}
park(): 让当前的线程进入 sleep。unpark(): 唤醒指定 TID 的线程。
首先第一个线程调用lock(),此时m->guard==0,因此不会自旋等待,会执行
if (m->flag == 0)
{
	m->flag = 1; // lock is acquired
	m->guard = 0;
}
其他线程调用lock(),如果第一个进程执行了一半被中断,比如刚好执行到上面的m->flag = 1,而没有执行m->guard = 0, 那么其他线程会在TestAndSet()中自旋等待一小段时间,这只有几条指令的时间,因此自旋等待一会不是问题。
其他线程正常的流程会直接调用到:
else
{
	queue_add(m->q, gettid());
	m->guard = 0;
	park();
}
把当前线程加入队列,并且进入 sleep,因为进入的时候TestAndSet()把 guard 置为 1 了,其他线程在等待,在进入 sleep 前还需要把m->guard置 0。
在当前进程用完锁后会调用unlock(), 如果此时还有其他线程正在等待锁,当前线程会执行到:
unpark(queue_remove(m->q)); // hold lock
直接将队列中下一个可以拥有锁的线程唤醒,因为此时锁的 flagm->flag仍然为 1,没有清过,所以此时拥有锁的线程为被唤醒的线程。
上面代码存在的一个问题有,如果第二个线程在即将调用park()前,发生了线程切换,切换到第一个线程,该线程释放了锁,再切回第二个线程调用park(),这样第二个线程可能永远睡下去。
为了解决这个问题,引入一个系统调用setpark(),表示自己即将要 park,如果发生了线程调度,其他线程调用了 unpark,那么该 park 会立即返回,而不会进入 sleep。
queue_add(m->q, gettid());
m->guard = 0;
park();

//修改为

queue_add(m->q, gettid());
setpark(); // new code
m->guard = 0;
28.16 Two-Phase Locks
真实的操作系统如 Linux 中,mutex lock 一般会先自旋等待一段时间,如果没有获得锁则进入 sleep。
Chapter29 Lock-based Concurrent Data Structures
29.1 Concurrent Counters
不带锁的计数器,会遇到 data race 问题,导致计数不正确:
typedef struct __counter_t {
	int value;
} counter_t;

void init(counter_t *c) {
	c->value = 0;
}

void increment(counter_t *c) {
	c->value++;
}

void decrement(counter_t *c) {
	c->value--;
}

int get(counter_t *c) {
	return c->value;
}
带锁的计数器,每个线程执行增加一定的 counter 数,按并发执行的理想情况,一个线程增加 10000 次和 4 个线程各增加 10000 次,总共 40000 次的时间应该是一样的。
事实是性能会随着线程数增多显著下降(拿不到锁,其他线程被浪费了)。

typedef struct __counter_t {
	int value;
	pthread_mutex_t lock;
} counter_t;

void init(counter_t *c) {
	c->value = 0;
	Pthread_mutex_init(&c->lock, NULL);
}

void increment(counter_t *c) {
	Pthread_mutex_lock(&c->lock);
	c->value++;
	Pthread_mutex_unlock(&c->lock);
}

void decrement(counter_t *c) {
	Pthread_mutex_lock(&c->lock);
	c->value--;
	Pthread_mutex_unlock(&c->lock);
}

int get(counter_t *c) {
	Pthread_mutex_lock(&c->lock);
	int rc = c->value;
	Pthread_mutex_unlock(&c->lock);
	return rc;
}
近似计数器,Approximate Counter。性能比上面简单带锁的计数器好。
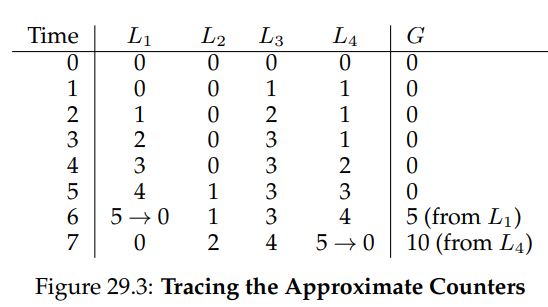
每个 CPU 核心分配一个 local counter,还有一个 global counter。当 local counter 达到设定的 Threshold S 后,把 local 值加入 global counter 中。如下图所示:
Threshold S 对计数器的性能有影响,S 越小,global counter 更新越快,越准确。S 越小,global counter 更新越慢,但性能更好。
typedef struct __counter_t {
	int global; // global count
	pthread_mutex_t glock; // global lock
	int local[NUMCPUS]; // per-CPU count
	pthread_mutex_t llock[NUMCPUS]; // ... and locks
	int threshold; // update freq
} counter_t;

// init: record threshold, init locks, init values
// of all local counts and global count
void init(counter_t *c, int threshold) {
	c->threshold = threshold;
	c->global = 0;
	pthread_mutex_init(&c->glock, NULL);

	for (int i = 0; i < NUMCPUS; i++) {
		c->local[i] = 0;
		pthread_mutex_init(&c->llock[i], NULL);
	}
}

// update: usually, just grab local lock and update
// local amount; once it has risen ’threshold’,
// grab global lock and transfer local values to it
void update(counter_t *c, int threadID, int amt) {
	int cpu = threadID % NUMCPUS;
	pthread_mutex_lock(&c->llock[cpu]);
	c->local[cpu] += amt;
	if (c->local[cpu] >= c->threshold) {
		// transfer to global (assumes amt>0)
		pthread_mutex_lock(&c->glock);
		c->global += c->local[cpu];
		pthread_mutex_unlock(&c->glock);
		c->local[cpu] = 0;
	}
	pthread_mutex_unlock(&c->llock[cpu]);
}

// get: just return global amount (approximate)
int get(counter_t *c) {
	pthread_mutex_lock(&c->glock);
	int val = c->global;
	pthread_mutex_unlock(&c->glock);
	return val; // only approximate!
}
注意,更新 local 和 global counter 的时候需要分别分配两把锁,因为一个 CPU 核心下可能也有多个线程来更新 local counter。global counter 是因为有多个 CPU 核心来更新。
29.2 Concurrent Linked Lists
展示了并发列表的插入和查找。
void List_Init(list_t *L) {
	L->head = NULL;
	pthread_mutex_init(&L->lock, NULL);
}

int List_Insert(list_t *L, int key) {
	// synchronization not needed
	node_t *new = malloc(sizeof(node_t));
	if (new == NULL) {
		perror("malloc");
		return -1;
	}
	new->key = key;
	// just lock critical section
	pthread_mutex_lock(&L->lock);
	new->next = L->head;
	L->head = new;
	pthread_mutex_unlock(&L->lock);
	return 0; // success
}

int List_Lookup(list_t *L, int key) {
	int rv = -1;
	pthread_mutex_lock(&L->lock);
	node_t *curr = L->head;
	while (curr) {
		if (curr->key == key) {
			rv = 0;
			break;
		}
		curr = curr->next;
	}
	pthread_mutex_unlock(&L->lock);
	return rv; // now both success and failure
}
29.3 Concurrent Queues
// TODO:
29.4 Concurrent Hash Table
// TODO:
Chapter30 Condition Variables
条件变量主要用于在某个条件满足后,执行某线程的任务,主要可以抽象为两个 API:
wait(): 阻塞等待条件变量 trigger,释放掉锁进入休眠,唤醒后拿回锁。signal(): trigger 条件变量,唤醒wait()
POSIX 接口:
pthread_cond_wait(pthread_cond_t *c, pthread_mutex_t *m);
pthread_cond_signal(pthread_cond_t *c);
Parent Waiting For Child: Use A Condition Variable:
int done = 0;
pthread_mutex_t m = PTHREAD_MUTEX_INITIALIZER;
pthread_cond_t c = PTHREAD_COND_INITIALIZER;

void thr_exit() {
	thread_mutex_lock(&m);
	done = 1;
	Pthread_cond_signal(&c);
	Pthread_mutex_unlock(&m);
}

void *child(void *arg) {
	printf("child\n");
	thr_exit();
	return NULL;
}

void thr_join() {
	Pthread_mutex_lock(&m);
	while (done == 0)
		Pthread_cond_wait(&c, &m);
	Pthread_mutex_unlock(&m);
}

int main(int argc, char *argv[]) {
	printf("parent: begin\n");
	pthread_t p;
	Pthread_create(&p, NULL, child, NULL);
	thr_join();
	printf("parent: end\n");
	return 0;
}
- 状态变量 done 是必须的。 如果没有 done 变量,先调用了
child()再调用thr_join(),会执行到Pthread_cond_wait()导致无限阻塞。而加入了 done 后,先调用child也没事,会把 done 置为 1,再调用thr_join(),不会再跑进Pthread_cond_wait,而是直接返回。 - 调用 wait()或 signal()前必须拥有锁。 如果调用
thr_join,跑到 while(done == 0)条件通过,在执行Pthread_cond_wait前,中断发生调用到 child 线程,执行了child(),之后再次返回到 parent 线程,调用到Pthread_cond_wait,此时没有子线程会唤醒父线程,会进入无限睡眠。
30.2 The Producer/Consumer (Bounded Buffer) Problem
生产者与消费者问题。假设有一个或多个生产者线程和一个或多个消费者线程。生产者把生成的数据项放入缓冲区,消费者从缓冲区取走数据项。
利用锁和条件变量解决单生产者多消费者的代码:
1  int buffer[MAX];
2  int fill_ptr = 0;
3  int use_ptr = 0;
4  int count = 0;
5
6  void put(int value) {
7 	buffer[fill_ptr] = value;
8 	fill_ptr = (fill_ptr + 1) % MAX;
9 	count++;
10 }
11
12 int get() {
13 	int tmp = buffer[use_ptr];
14 	use_ptr = (use_ptr + 1) % MAX;
15 	count--;
16 	return tmp;
17 }
1  cond_t empty, fill;
2  mutex_t mutex;
3
4  void *producer(void *arg) {
5  	int i;
6  	for (i = 0; i < loops; i++) {
7  		Pthread_mutex_lock(&mutex); // p1
8  		while (count == MAX) // p2
9  			Pthread_cond_wait(&empty, &mutex); // p3
10 		put(i); // p4
11 		Pthread_cond_signal(&fill); // p5
12 		Pthread_mutex_unlock(&mutex); // p6
13 	}
14 }
15
16 void *consumer(void *arg) {
17 	int i;
18 	for (i = 0; i < loops; i++) {
19 		Pthread_mutex_lock(&mutex); // c1
20 		while (count == 0) // c2
21 			Pthread_cond_wait(&fill, &mutex); // c3
22 		int tmp = get(); // c4
23 		Pthread_cond_signal(&empty); // c5
24 		Pthread_mutex_unlock(&mutex); // c6
25 		printf("%d\n", tmp);
26 	}
27 }
- 第一个问题。p2, c2 必须是 while 循环,而不是 if 判断。比如在消费者在 c2 判断 count 为 0,c3 进入睡眠后,可能有另一个消费者把生产者的 count=1 拿走了,此时唤醒第一个消费者,count 实际仍未 0 而非 1,但流程还会往下跑。因此对条件变量必须使用 while。
- 第二个问题。生产者和消费者的条件变量不能使用同一个,需要两个。因为需要限制生产者只能唤醒消费者,消费者只能唤醒生产者。而不能消费者唤醒消费者这样,会导致三个线程都进入睡眠。
Chapter31 Semaphores
POSIX 标准信号量 API:
// decrement the value of semaphore s by one wait if value of semaphore s is negative
sem_wait(sem_t *s);
// increment the value of semaphore s by one if there are one or more threads waiting, wake one
sem_post(sem_t *s);
#include <semaphore.h>
sem_t s;
sem_init(&s, 0, 1);
信号量的初始值决定了一些行为,因此信号量使用前需要初始化:
第二个参数为 0 表示信号量实在同一进程的多线程中共享。
第三个参数为 1 表示信号量初始值为 1。
31.2 Binary Semaphores (Locks)
二值信号量等同于锁。
sem_t m;
sem_init(&m, 0, X); // init to X; what should X be?

sem_wait(&m);
// critical section here
sem_post(&m);
X 应该初始化为 1。
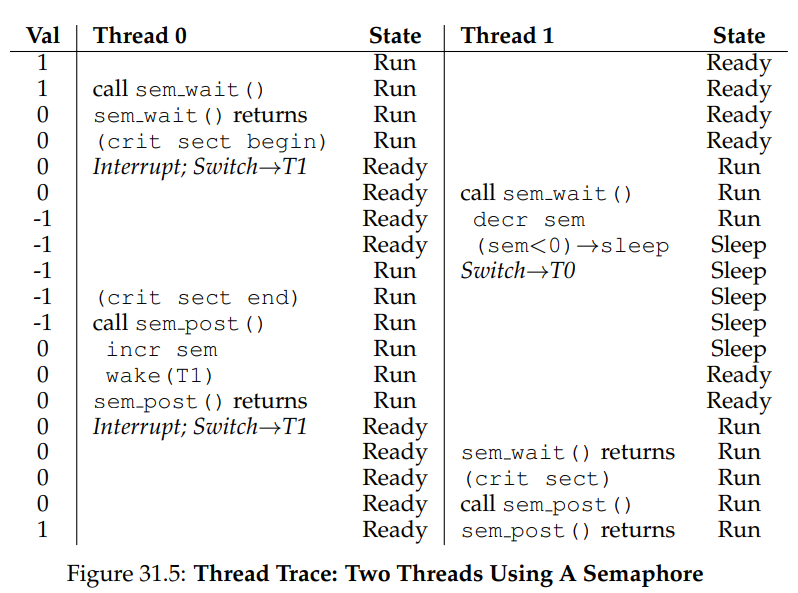
两个线程的情况如下:
31.3 Semaphores For Ordering
信号量用作条件变量。
sem_t s;

void *child(void *arg) {
	printf("child\n");
	sem_post(&s); // signal here: child is done
	return NULL;
}

int main(int argc, char *argv[]) {
	sem_init(&s, 0, X); // what should X be?
	printf("parent: begin\n");
	pthread_t c;
	Pthread_create(&c, NULL, child, NULL);
	sem_wait(&s); // wait here for child
	printf("parent: end\n");
	return 0;
}
父线程调用sem_wait()阻塞等待子线程调用sem_post()。
这里 X 应该初始化为 0。
有两种情况
- 第一种父线程先调用到
sem_wait()后, 子线程才开始执行。 - 第二种父进程
Pthread_create()创建子线程后,子线程执行完毕,才调用到sem_wait()。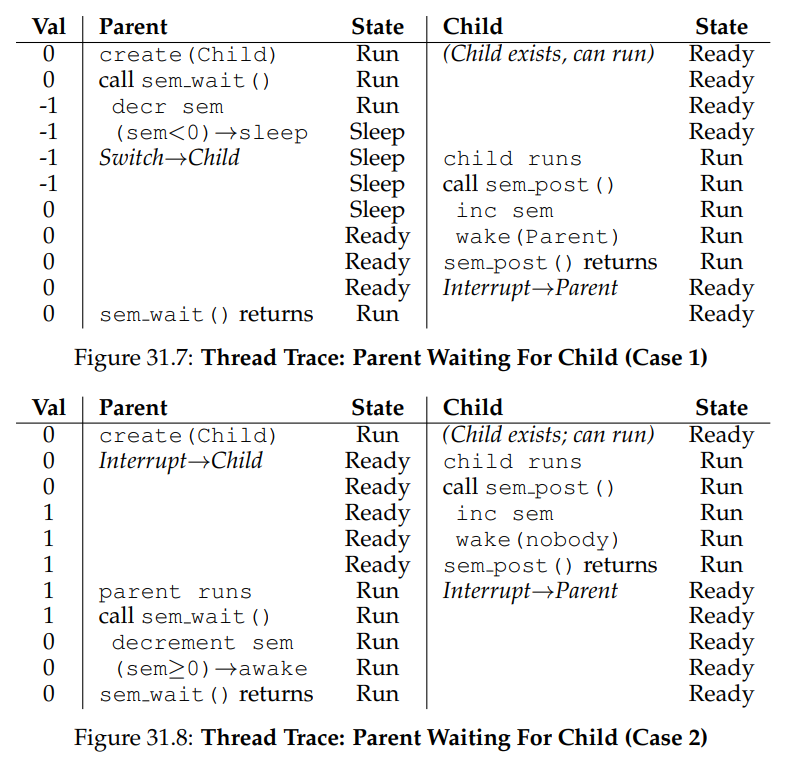
31.4 The Producer/Consumer (Bounded Buffer) Problem
利用信号量解决多生产者多消费者问题:
int buffer[MAX];
int fill = 0;
int use = 0;

void put(int value) {
	buffer[fill] = value; // Line F1
	fill = (fill + 1) % MAX; // Line F2
}

int get() {
	int tmp = buffer[use]; // Line G1
	use = (use + 1) % MAX; // Line G2
	return tmp;
}
void *producer(void *arg) {
	int i;
	for (i = 0; i < loops; i++) {
		sem_wait(&empty); // Line P1
		sem_wait(&mutex); // Line P1.5 (lock)
		put(i); // Line P2
		sem_post(&mutex); // Line P2.5 (unlock)
		sem_post(&full); // Line P3
	}
}

void *consumer(void *arg) {
	int i;
	for (i = 0; i < loops; i++) {
		sem_wait(&full); // Line C1
		sem_wait(&mutex); // Line C1.5 (lock)
		int tmp = get(); // Line C2
		sem_post(&mutex); // Line C2.5 (unlock)
		sem_post(&empty); // Line C3
		printf("%d\n", tmp);
	}
}
在 put()和 get()前后需要用锁(这里用了二值信号量)来保护。防止比如有两个生产者/消费者在 put()/get()中 fill/use 还没更新,另一个就调度的情况。
31.5 Reader-Writer Locks
写就是简单的锁(二值信号量实现)。
读可以有多个读者,记录读者的数量,第一个读者会获取写锁,这样让写者无法获得锁,无法写数据。
只有在所有读者完成读后才会轮到写。
typedef struct _rwlock_t {
	sem_t lock; // binary semaphore (basic lock)
	sem_t writelock; // allow ONE writer/MANY readers
	int readers; // #readers in critical section
} rwlock_t;

void rwlock_init(rwlock_t *rw) {
	rw->readers = 0;
	sem_init(&rw->lock, 0, 1);
	sem_init(&rw->writelock, 0, 1);
}

void rwlock_acquire_readlock(rwlock_t *rw) {
	sem_wait(&rw->lock);
	rw->readers++;
	if (rw->readers == 1) // first reader gets writelock
		sem_wait(&rw->writelock);
	sem_post(&rw->lock);
}

void rwlock_release_readlock(rwlock_t *rw) {
	sem_wait(&rw->lock);
	rw->readers--;
	if (rw->readers == 0) // last reader lets it go
		sem_post(&rw->writelock);
	sem_post(&rw->lock);
}

void rwlock_acquire_writelock(rwlock_t *rw) {
	sem_wait(&rw->writelock);
}

void rwlock_release_writelock(rwlock_t *rw) {
	sem_post(&rw->writelock);
}
31.6 The Dining Philosophers
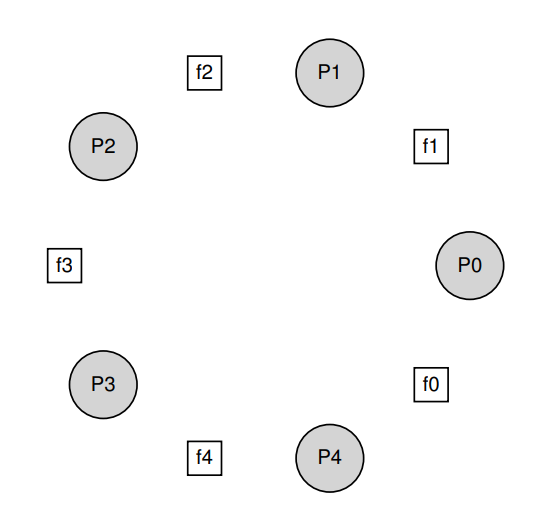
哲学家就餐问题。每个哲学家拿到左手和右手的刀叉才能进餐。
假设每个人都持有左手的锁,导致都会阻塞等待右手的锁,陷入死锁。
解决方案是调整一个哲学家拿锁的顺序,其他人都是先拿左手再拿右手,调整一个人先拿右手再拿左手即可解决。
void get_forks(int p) {
	if (p == 4) {
		sem_wait(&forks[right(p)]);
		sem_wait(&forks[left(p)]);
	} else {
		sem_wait(&forks[left(p)]);
		sem_wait(&forks[right(p)]);
	}
}
31.7 How To Implement Semaphores
用锁和条件变量实现信号量:
typedef struct __Zem_t {
	int value;
	pthread_cond_t cond;
	pthread_mutex_t lock;
} Zem_t;

// only one thread can call this
void Zem_init(Zem_t *s, int value) {
	s->value = value;
	Cond_init(&s->cond);
	Mutex_init(&s->lock);
}

void Zem_wait(Zem_t *s) {
	Mutex_lock(&s->lock);
	while (s->value <= 0)
	Cond_wait(&s->cond, &s->lock);
	s->value--;
	Mutex_unlock(&s->lock);
}

void Zem_post(Zem_t *s) {
	Mutex_lock(&s->lock);
	s->value++;
	Cond_signal(&s->cond);
	Mutex_unlock(&s->lock);
}
Chapter32 Common Concurrency Problems
32.2 Non-Deadlock Bugs
非死锁的 bug 主要有两个,分别是 atomicity violation 和 order violation。
atomicity violation 违反原子性
//Thread 1::
if (thd->proc_info) {
	fputs(thd->proc_info, ...);
}

//Thread 2::
thd->proc_info = NULL;
如果 Thread1 的 if 语句执行完后,执行了 Thread2,接着再执行 Thread1 就会发生引用空指针导致错误。
这里 Thread1 中语句应该要原子执行,不能被打断。
解决方案是加锁:
pthread_mutex_t proc_info_lock = PTHREAD_MUTEX_INITIALIZER;

//Thread 1::
pthread_mutex_lock(&proc_info_lock);
if (thd->proc_info) {
	fputs(thd->proc_info, ...);
}
pthread_mutex_unlock(&proc_info_lock);

//Thread 2::
pthread_mutex_lock(&proc_info_lock);
thd->proc_info = NULL;
pthread_mutex_unlock(&proc_info_lock);
order violation 违反顺序缺陷
//Thread 1::
void init() {
	mThread = PR_CreateThread(mMain, ...);
}

//Thread 2::
void mMain(...) {
	mState = mThread->State;
}
如果 Thread2 先执行,mThread 还没被初始化,会导致错误。在这里执行顺序必须是先 Thread2,再 Thread1。
解决方案是利用信号量来控制执行顺序。
32.3 Deadlock Bugs
线程 1 拥有锁 1,想得到锁 2;线程 2 拥有锁 2,想得到锁 1,这就导致了死锁。
死锁产生需要四个条件,缺少一个都无法产生死锁:
- Mutual exclusion互斥。对需要访问的资源是互斥的,不能同时拥有。
- Hold-and-wait持有并等待。线程持有一把锁,并等待获取另一把锁。
- No preemption非抢占。得到的锁不能被抢走。
- Circular wait循环等待。线程之间存在一个环路,路上每个线程都额外持有一个资源,而这个资源又是下一个线程要申请的。
预防死锁
如何预防死锁?有以下几种策略来避开死锁产生的条件:
Circular Wait
通过统一的申请顺序避免循环等待。假设系统有两个锁,那么我们申请的时候每次都先申请第一把锁,再申请第二把锁。
Hold-and-wait
通过原子地抢锁避免持有并等待。增加一个 prevention 锁,如果拿到这个锁,后面的 L1,L2 是原子操作,不会有线程打断。
pthread_mutex_lock(prevention); // begin acquisition
pthread_mutex_lock(L1);
pthread_mutex_lock(L2);
//...
pthread_mutex_unlock(prevention); // end
No Preemption
通过 Trylock()函数避免非抢占问题。
如果拿不到 L2 锁,就会返回非 0 值,这样先释放 L1, 再返回 top 重新获取 L1 和 L2。
top:
	pthread_mutex_lock(L1);
	if (pthread_mutex_trylock(L2) != 0) {
		pthread_mutex_unlock(L1);
		goto top;
	}
Mutual Exclusion
通过硬件指令,设计无需锁的数据结构,避免互斥。
通过调度避免死锁
检查和恢复
允许死锁,检测到死锁后重启系统等等。